*only a partial map
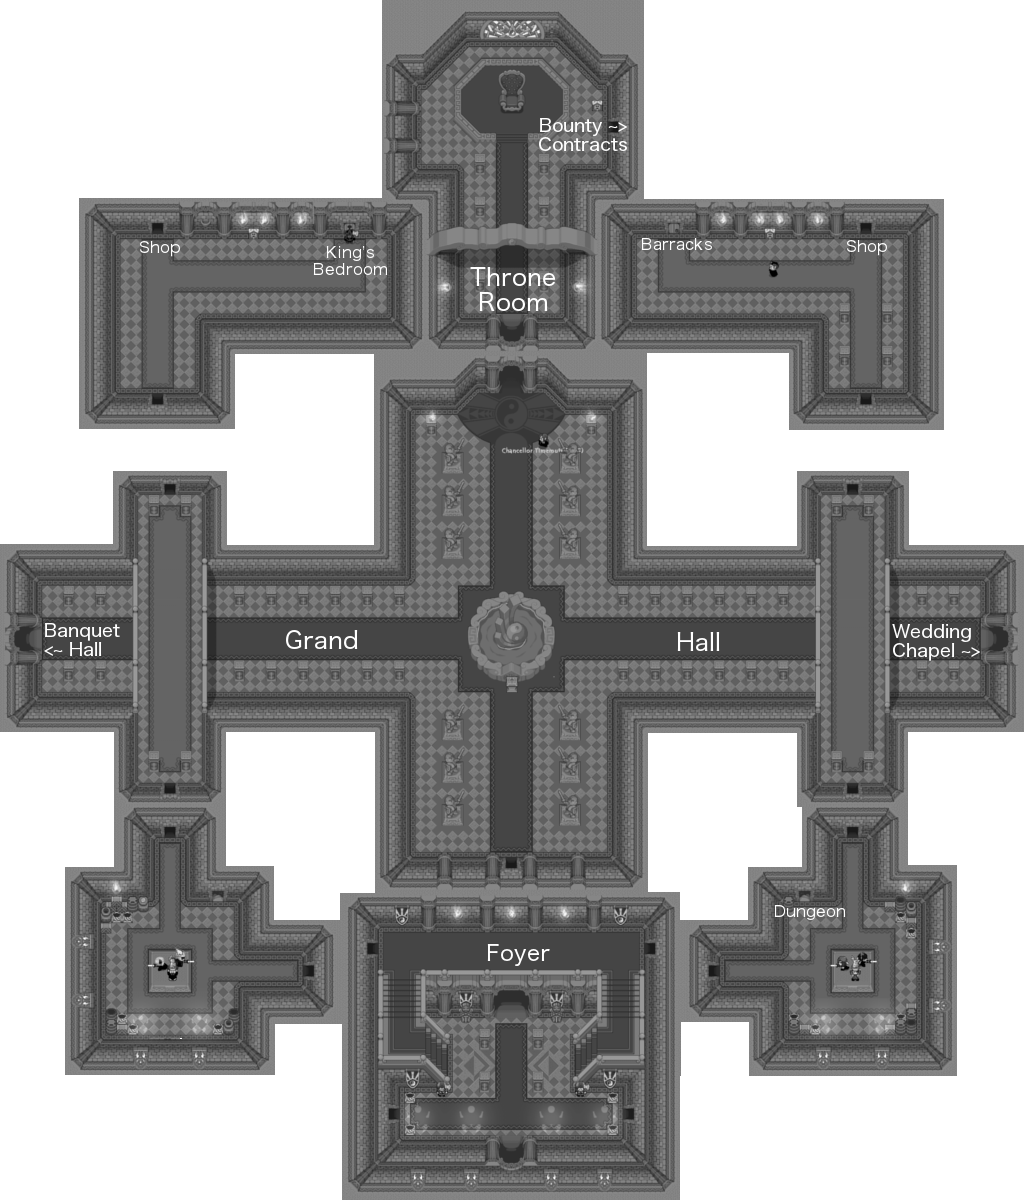
Castle.
Items Obtained: a free guard's hat
The Castle is situated on an island between Graal City and Delta Island. You probably have already visited and explored the Castle by the time you completed all the other quests, but I'll explain how to get there anyway. The main way to get here is the bridge in the southwest corner of Graal City; however, after crossing the bridge, you will have to get in the water anyway and swim across to the entrance. If you are coming from the south, just take a shortcut through the back door of the orphanage (“unstuck me” building), and walk along the path leading north to the other bridge. Just inside the entrance, there is a courtyard with a few things for sale. I think it is worth noting there is a horseshoe upgrade here. It gives a small speed boost for a rather steep price of 20,000. However, this can only be applied to ONE mount. I don’t recommend buying it at all unless your favorite mount to use is noticeably slower than others.
Alright, first thing’s first. Once you enter the Castle for the first time, there are a few free chests to open. From the foyer, go up the right staircase and take the upper-right door. Walk straight across the hall to the next door. In this corner room, there two more doors: a stairwell leading back downstairs, and a door at the top; take the top door. Walk up across this balcony bridge and through the next door. This room also has two doors on the top; take the left door into the guard barracks. Sadly, there are no gralats in the chests. The only thing to rob from the guard are free bombs and arrows. However the top-right chest contains a free guard hat (pretty much the only reason I led you here first).
Anyway, the Castle has plenty to see, so I will let you explore it yourself. There are a few shops and other things to look at. For information on the Daily Bounty, go to the Bounty Contracts page under the “Making Gralats” section. Below is information for main part of the Castle quest: obtaining the Warp Ring.
Anyway, the Castle has plenty to see, so I will let you explore it yourself. There are a few shops and other things to look at. For information on the Daily Bounty, go to the Bounty Contracts page under the “Making Gralats” section. Below is information for main part of the Castle quest: obtaining the Warp Ring.
Warp Ring Quest.
Items Required: Upgraded Lantern
Items Obtained: Warp Ring
Items Obtained: Warp Ring
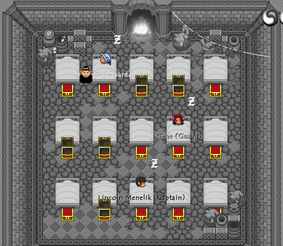
This quest actually begins in the Guards Outpost, an annex west of the Castle outer wall. You can get here on land by walking counterclockwise all the way around the outer wall of the Castle. Or it is easier to just get in the water, swim west to Delta (there are stairs back to land on southeast corner of Delta), then back east across the bridge. Or from MoD Town, use a draisine on the railroad.
Inside the Guard Outpost, your goal is to steal the Castle Treasury Key without getting caught. If a guard sees you, you will be thrown outside and will have to start over. This means you cannot walk in front of a guard (unless he is asleep). However, guards cannot see through obstacles, so you are able to hide behind things. Sleepy guards wake up and go back to sleep every few seconds, so you can only pass in front of them when they are sleeping.
Inside the Guard Outpost, your goal is to steal the Castle Treasury Key without getting caught. If a guard sees you, you will be thrown outside and will have to start over. This means you cannot walk in front of a guard (unless he is asleep). However, guards cannot see through obstacles, so you are able to hide behind things. Sleepy guards wake up and go back to sleep every few seconds, so you can only pass in front of them when they are sleeping.
|
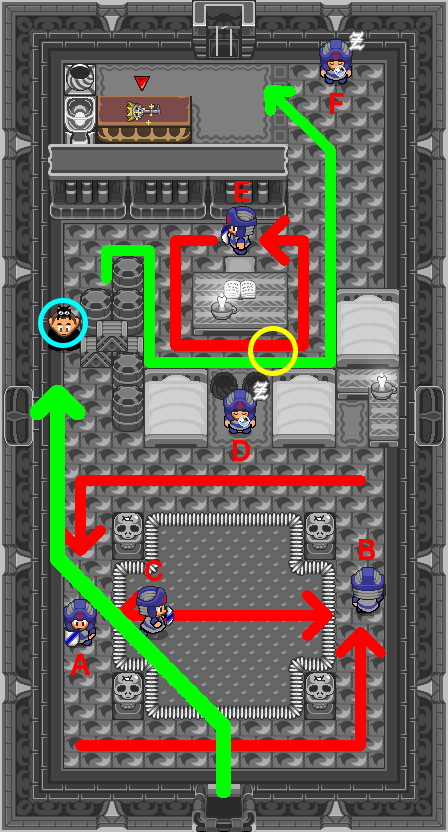
In the front half of the room, there are four guards. One sleepy guard (D) is stationed directly in front of the door. One guard (C) walks left and right across the yellow rug. Two guards (A and B) walk in a counterclockwise square path around the skull posts. If you stand idle at the door too long, guard A will see you when he turns the corner. When you first enter, guard C will be running left. As soon as guard C turns around and starts running right, this is your chance to run up-left diagonally. Just hold the up and left arrow keys until you are safe between the barrels and wall. The area around the cyan-colored ring is a safe checkpoint. If you start running too soon, guard C will see you from his peripheral; and if you start running too late, guard B may catch you when he turns the top corner.
In the back half of the room, there are two guards. One sleepy guard (F), and one guard (E) that walks counterclockwise around the table. Follow behind guard E around the table; but wait at the bottom right corner (yellow ring) until guard F is asleep. You will have to hurry quickly around the bookcase before guard E turns the corner facing upward. If you continuously fail the back half, just wait at the checkpoint and allow guard E to make one full circle around the table before following him. Sometimes guard F’s sleep cycle doesn’t sync perfectly with guard E’s circle path. Anyway, pick up the key and get out (after you have the key, you will not lose it; so it is okay to be seen). Still need help? Here's an animated GIF! (Credit to Noxious). |
Now that you have the key, go inside the Castle. From the foyer, go up the left stairs and take the upper left door. Go straight left across the hall and take the next door. In this corner room, there are two doors: one staircase leading back downstairs, and a door at the top; take the top door. Walk up across the balcony bridge to the next door. You should be in the hallway seen above.
|
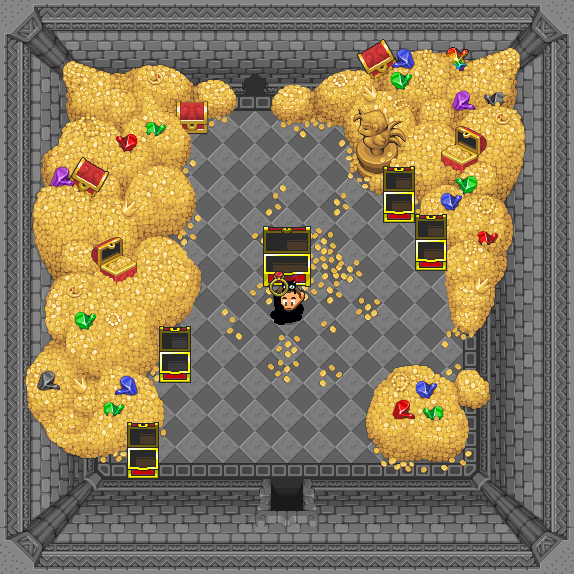
If you haven’t noticed already, there is a walking NPC that circles around the castle in a hurry to make sure all the sconces are lit. However, it seems he forgot one here in this room. Get out your upgraded lantern and light it. (If you do not have an upgraded lantern that throws fireballs, go complete the first quest on the "Destiny” page). A secret passage will be revealed leading to the king’s treasury. We better not steal all of it, or we will get in trouble. But I guess it would be okay to swipe 130 gralats from the chests. The large chest in the center is opened with the key we just stole. Inside the large chest is the Warp Ring.
|
|
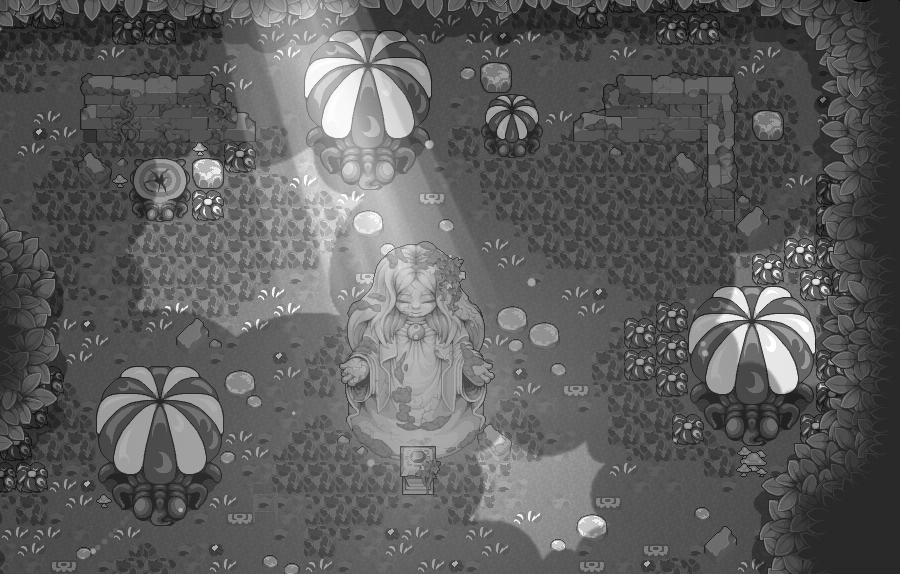
First Warp Crystal.
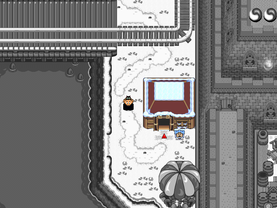
The Warp Ring is in your Tools folder of your item inventory. The first time you use the item, it opens a “Warp Locations” menu, but the only option is “???.” Tap it and you will be warped to a secret garden cave (this cave is actually located just east of the Golden Gate, but is inaccessible). In front of the statue, there is warp pedestal. Grab the front of it and remove the red warp crystal. Note: if you remove the warp crystal from this pedestal, you will never be able to return to this garden. However, there is no further gameplay content in here, so that doesn’t matter.
Using the Warp Ring and Crystals.
You are only able to warp to warp pedestals that hold one of your warp crystals. The warp crystal you grabbed earlier is in your Tools inventory also. Set it as a hotkey and use it while standing in front of a warp pedestal.
There are thirteen warp pedestals around the world, but you currently only have one crystal; so you need to choose wisely where you decide to set your warp crystal.
There are thirteen warp pedestals around the world, but you currently only have one crystal; so you need to choose wisely where you decide to set your warp crystal.
- "???" Secret Garden. (Cave east of the Golden Gate). This area is inaccessible after removing the first warp crystal.
- Castle. Inside the grand hall, in front of the fountain.
- Onnet Town. The northernmost point, next to the forest maze and the railroad.
- MoD Town. The southwest corner, under the outdoor bar.
- Delta Island. Between the bridge and the guild spar battle arena.
- Stables. In Master Li's forest, just under the horse stables.
- York Town. Next to the cathedral entrance.
- Snow Town. East of the Snowtown Lodge, south of Snow Tunes.
- Railsystem Cave. Inside the railroad cave between York Town and Snow Town; In front of the lonely tree.
- Deadwood. South of the Deadwood Tower.
- Swamp Town. In the southwest corner, between the Swamp Town Tower, and Floydian's house.
- Destiny. In the southeast corner, next to the Graal Fire Department.
- Big City. Just north of the ship.
Note: if you try to use the warp ring, but none of the crystals are sitting on pedestals, then nothing will happen.
Additional Warp Crystals.
Items Required: Warp Ring, Coin Flip, Upgraded Lantern, Rat Morph, Diving Flippers, Shovel
Items Obtained: 3 Warp Crystals
Items Obtained: 3 Warp Crystals
There are a total of 3 Warp Crystals to obtain.
- The original warp crystal taken from the "???" garden cave.
- There is a warp crystal for sale in the Owl's Nest for 8,000 gralats. (If you don't remember, this place is in Destiny, and you need the loaded coin flip to get inside. See "Destiny" page for more info).
- The third warp crystal is in the King's bedroom. See full explanation below.
Note: Lately, there have been false rumors of people saying there are more crystals obtained from loot diving or treasure hunting. This is not true, there are only 3.
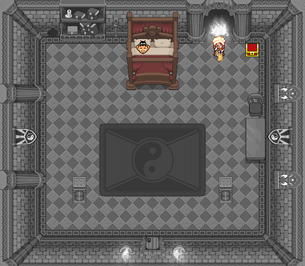
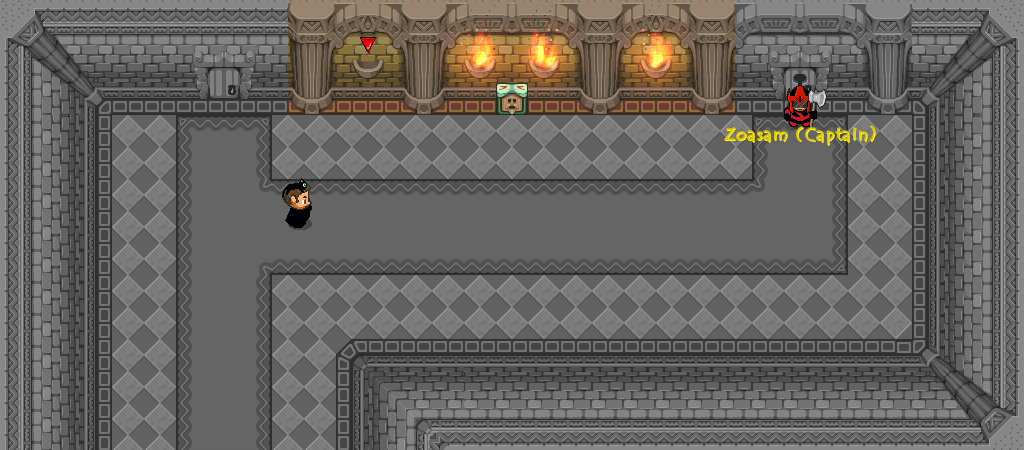
The third warp crystal mentioned above is in a chest inside the King's bedroom of the Castle. The King’s bedroom is connected to the same hallway where you got the Warp Ring (see instructions above for how to find this part of the Castle). However, the red captain of the guard will not allow anyone through the door; but we can sneak in a different way. Use your lantern to light the sconce again to open the secret passage. Inside the treasury, use the rat morph and go through the hole in the top wall. In this tiny passage, go up, then all the way right (ignore the two dead-end branches), then down. Now you are inside the King’s bedroom. However, the maid is blocking the chest that contains the warp crystal, and she will kick you out of the bedroom if she sees you.
The only way to open the chest is to enter the room when the King is sleeping. But the King spends most of his time around the Castle. He could be in the throne room, the banquet hall, the garden, the cathedral, or his bedroom. The King rotates around these locations every 3 hours… So I definitely do not recommend just waiting around and waiting for him to sleep. You should just check around the Castle every 3 hours. An easy to check if the King is in his bedroom: if the Maid is cleaning the throne room, that means the King is asleep. So then go back to his bedroom through the secret passage again. Since the King is asleep, you can freely go open the chest for the third warp crystal.
The only way to open the chest is to enter the room when the King is sleeping. But the King spends most of his time around the Castle. He could be in the throne room, the banquet hall, the garden, the cathedral, or his bedroom. The King rotates around these locations every 3 hours… So I definitely do not recommend just waiting around and waiting for him to sleep. You should just check around the Castle every 3 hours. An easy to check if the King is in his bedroom: if the Maid is cleaning the throne room, that means the King is asleep. So then go back to his bedroom through the secret passage again. Since the King is asleep, you can freely go open the chest for the third warp crystal.
